
The WP Toolkit in cPanel makes it easy to create a staging environment for your WordPress site. A staging site is a safe copy of your live website where you can test changes, updates, or new features before publishing them to your main site.
Why Use Staging?
-
Test updates, plugins, and themes without affecting your live site.
-
Experiment with design changes safely.
-
Push changes to production only when ready.
-
Reduce downtime and avoid breaking your live site.
Creating a Staging Site
-
Log in to cPanel.
-
On the Tools page → Domains section, click WP Toolkit.
-
Locate the WordPress installation you want to stage.
-
Click Clone.
-
Choose where to clone the site:
-
New Subdomain (e.g.,
staging.example.com) -
Existing Domain/Subdomain
-
-
(Optional) Change the database name if needed.
-
Click Start.
-
WP Toolkit will create a staging copy of your site.
Synchronizing Data Between Sites
Once you’ve made changes on the staging site, you can sync them back to the live site:
-
In WP Toolkit, locate the source site (live or staging).
-
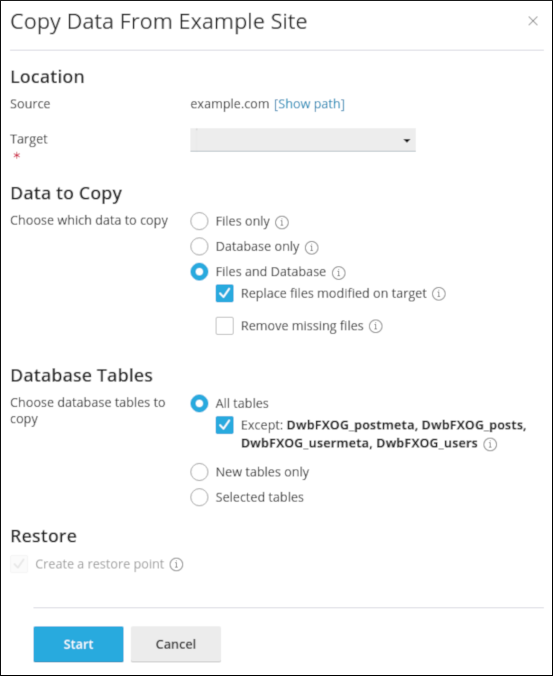
Click Copy Data.
-
In the Copy Data dialog:
-
Location → Select the destination site (staging or live).
-
Data to Copy → Choose files, database, or both.
-
Database Tables → Select specific tables, new tables, or all tables.
-
(Optional) Create a Restore Point → Enables rollback if something goes wrong.
-
-
Click Start.
-
WP Toolkit copies the selected data to the destination site.
Notes
-
Always create a restore point before syncing data.
-
Staging sites can become out of sync with the live site sync regularly if needed.
-
Use staging for testing updates, new plugins, or design changes before applying them live.


