WordPress Basics
You've decided to start blogging with WordPress—excellent choice! As the world’s most popular content management system (CMS), WordPress makes it easy to build, manage, and grow your website without needing advanced technical skills. This article walks you through how to get your WordPress site up and running.
Step 1: Install WordPress
The first step is to install WordPress on your hosting account.
If you haven’t yet ordered a hosting account, this process is simple. When you purchase your hosting plan from ruachost.com, just select WordPress from the list of one-click installation options. Once your account is set up, WordPress will be automatically installed and ready for you to use.
If you already have a hosting account with ruachost.com, there are two main ways to install WordPress:
-
Softaculous Installer:
Softaculous is an automated application installer provided with managed hosting accounts at ruachost.com. It lets you install WordPress (and many other applications) with just a few clicks. For details on installing WordPress using Softaculous, see our guide on installing applications with Softaculous. -
Manual Installation:
You can also install WordPress manually, which gives you more control but requires extra configuration steps. For detailed instructions, see our manual installation guide.
Once WordPress is installed, you’re ready to start customizing your site.
Step 2: Import Content (Optional)
If you have existing content from another website or blogging platform, you can import it into WordPress. Because every platform stores data differently, importing methods vary.
The official WordPress documentation offers a full list of supported import methods for different platforms. Visit https://codex.wordpress.org/Importing_Content for details.
Tip:
If you’re importing content from another WordPress site, you can do this directly within the WordPress dashboard. Check out our article on importing content between WordPress sites for a step-by-step guide.
Step 3: Customize WordPress
Before you start publishing, take time to personalize your site’s look and functionality. WordPress supports thousands of themes and plugins to make your site unique.
Themes
Themes define your site’s overall design, including fonts, colors, and layouts. Thousands of free and premium themes are available at https://wordpress.org/themes.
Once you’ve selected a theme, install and activate it from your WordPress dashboard to instantly change your site’s appearance. For installation steps, see our article on installing WordPress themes.
Plugins
Plugins extend WordPress functionality. You can find plugins for SEO, security, analytics, forms, image optimization, and much more at https://wordpress.org/plugins.
Important:
Avoid installing too many plugins, as they can slow down your site or cause compatibility issues. Stick to essential, reputable plugins.
Step 4: Create Content
With your WordPress setup complete, it’s time to start creating content for your audience.
Posts and Pages
WordPress divides content into posts and pages:
-
Posts appear in reverse chronological order on your site’s homepage or blog feed. They often allow reader comments and appear in your RSS feed.
-
Pages contain static content that doesn’t change often—like “About Us” or “Contact” pages—and are not included in your RSS feed.
Most blogs primarily consist of posts, with a few supporting pages. When launching your site, start by creating key pages first, then focus on publishing regular posts to keep your content fresh.
Let's create a new post for your site. To do this, follow these steps:
-
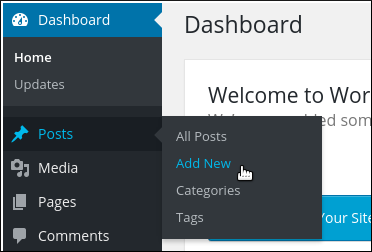
Log in to WordPress as the administrator. The dashboard appears.
-
In the left-side pane, click Posts, and then click Add New:
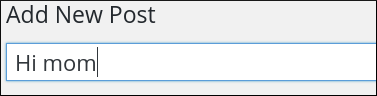
3. Under Add New Post, in the first text box, type a title for the post, such as Hi mom:
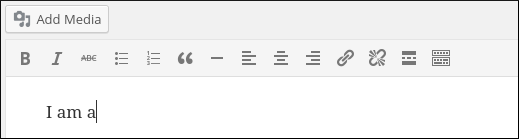
4. In the large text box, type the content for the post:
|
Tip You can use the icons in the toolbar above the text box to add formatting and styling to your text. |
5. The Publish section displays the status of the post:
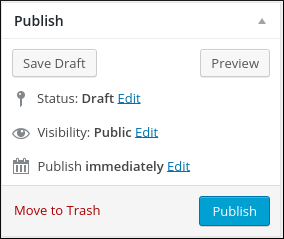
To save the content as a draft and work on it later, click Save Draft. To preview what the new post looks like, click Preview. Because this is a very simple example, go ahead and click Publish. The post appears on the home page immediately.
|
Tip The Save Draft feature is perfect for capturing ideas when you're not ready yet to publish a post for everyone to see. |
Now that you know how to create and publish a post, let's create a new static page. To do this, follow these steps:
-
Log in to WordPress as the administrator. The dashboard appears.
-
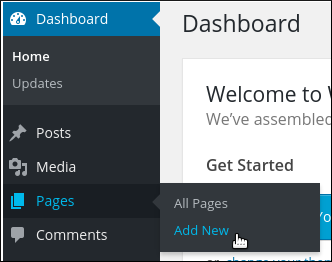
In the left-side pane, click Pages, and then click Add New:
3. Under Add New Post, in the first text box, type a title for the post, such as Hi mom:
4. In the large text box, type the content for the post:
|
Tip You can use the icons in the toolbar above the text box to add formatting and styling to your text. |
5. The Publish section displays the status of the post:
To save the content as a draft and work on it later, click Save Draft. To preview what the new post looks like, click Preview. Because this is a very simple example, go ahead and click Publish. The post appears on the home page immediately.
Now that you know how to create and publish a post, let's create a new static page. To do this, follow these steps:
-
Log in to WordPress as the administrator. The dashboard appears.
-
In the left-side pane, click Pages, and then click Add New:
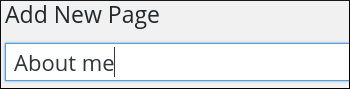
3. Under Add New Page, in the first text box, type a title for the page, such as About me:
4. In the large text box, type the content for the page, such as "I am a thirty-something tightrope walker who likes to read Nabokov by moonlight":
5. The Publish section displays what you need to know about the status of this page:
To save the content as a draft and work on it later, click Save Draft. To preview what the new page looks like, click Preview. Because this is a very simple example, go ahead and click Publish. On most themes, a link to the About me page appears automatically on your site's home page.
|
Note Some themes may require some additional configuration to get the About me page link to appear. For example, if you are using the default Twenty Fifteen theme, follow these steps to make page links appear on the home page:
|
After you post content, you probably want readers to be able to add comments and discuss what you have written. WordPress makes it easy to approve, edit, reply, and do other tasks with reader comments.
For information about how to manage comments for WordPress, please see this article.


